

Deep Vacuuming (Evacuation) for Heat Pump Installs: The Step That Separates Pros From “Good Enough”
Deep Vacuuming
If you read our “Heat Pump Installation in San Francisco: Best Practices Every Homeowner Should Know” post, you saw Step #1: Deep Vacuuming and Clean Lines—and that’s not there for decoration.
This follow-up is the deep dive: what “deep vacuuming” actually is, why it matters, the shortcuts that cause problems later, and what you (as a homeowner) can ask for on install day to make sure it’s done correctly—especially in San Francisco, where many homes are older and installs are rarely “textbook.”
What “deep vacuuming” means in plain terms
When a heat pump is installed, the refrigerant circuit must be free of:
Air (non-condensables)
Moisture (water vapor)
Debris/contaminants
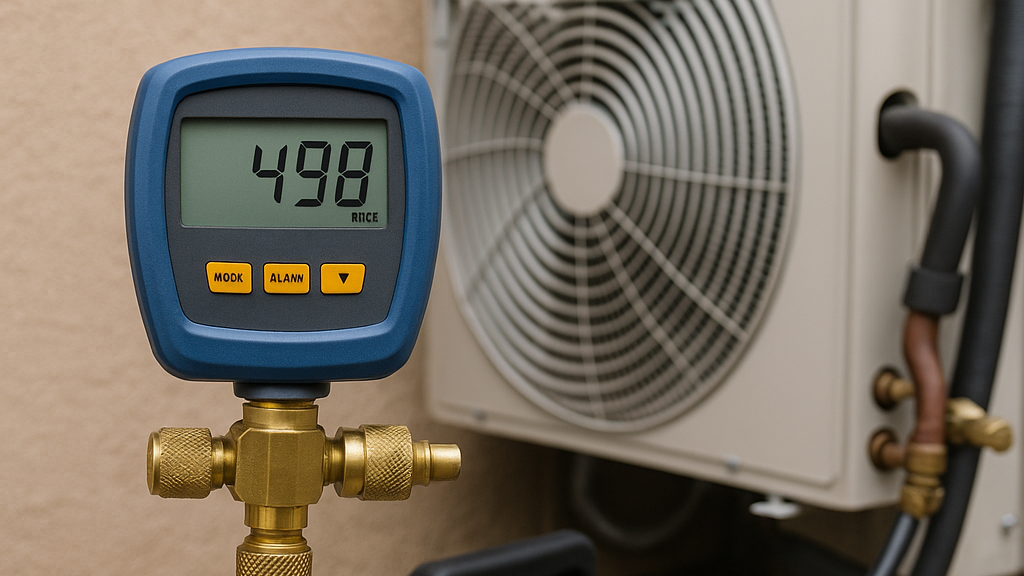
Deep vacuuming (often called evacuation) uses a vacuum pump and a micron gauge to pull the system down to a very low absolute pressure so moisture boils off and is removed, and so the system is verified as tight and dry.
A common minimum benchmark you’ll see referenced is 500 microns, and many high-quality installers aim 300 microns or lower, then verify it holds.
Why moisture and air are such a big deal
1) Moisture becomes acids and sludge over time
Even tiny amounts of water inside a refrigeration system can react with oil and refrigerant chemistry, contributing to acid formation and contamination that slowly damages components.
2) Moisture can freeze at metering devices
That’s how you get intermittent issues that make everyone crazy: the system runs, then doesn’t, then runs again—because moisture can freeze at the expansion valve / metering device and restrict flow.
3) Non-condensables raise pressures and reduce efficiency
Air in the circuit doesn’t condense like refrigerant does. It can drive higher head pressure, worsen performance, and increase compressor stress. Over time, that’s money and lifespan lost.
The standard is not “29 inches of vacuum”
A lot of sloppy work hides behind the phrase: “We pulled a vacuum.”
Here’s the problem: analog manifold gauges are basically useless for verifying dehydration. Real evacuation quality is measured in microns, not “inches of Hg,” and the system must be isolated and observed to confirm it holds vacuum.
Industry guidance commonly points to evacuation to ≤500 microns and then isolating the system to ensure the vacuum holds within acceptable limits.
How good installers do it (and why it takes longer)
Step A — Set up for flow, not convenience
A deep vacuum isn’t just about the pump. It’s about conductance (how easily vapor can move through the evacuation setup).
A high-quality setup often includes:
Valve core removal tools (Schrader cores severely restrict flow)
Large-diameter vacuum hoses (not skinny manifold hoses)
Minimal restrictions between the pump and the system
This is one of the biggest differences between “fast” and “right.”
Step B — Measure vacuum at the system, not at the pump
If you measure at the pump, you can fool yourself. Proper practice is to place the micron gauge where you want the dryness confirmed—on the system, away from the pump—because restrictions and components mean the system reaches target later than the pump does.
Step C — Pull down, then prove it with a standing/vacuum decay test
Hitting 500 microns for a moment doesn’t prove the system is dry and tight. The real test is:
Pull to target (often ≤500 microns, ideally lower)
Isolate from the pump
Watch whether the pressure rises—and how it rises
Rising vacuum can mean:
A leak
Moisture still boiling off
A mix of both
Standards and guidance commonly emphasize isolating the system after evacuation and verifying it holds vacuum to confirm acceptable dehydration/tightness.
The shortcuts that cause expensive problems later
Here are the most common “looks fine today, fails later” shortcuts:
Shortcut 1 — “We vacuumed for 10 minutes”
Evacuation time is not a fixed number. A proper evacuation might be quick on a clean, dry system—or it might take much longer if moisture is present. “It takes what it takes” is closer to reality than any promised time estimate.
Shortcut 2 — Leaving valve cores in (slow evacuation, fake confidence)
Leaving Schrader cores in place chokes the evacuation path. That’s why core removal tools exist: removing the restriction allows the pump to actually do its job.
Shortcut 3 — Measuring microns in the wrong place
A micron gauge next to the pump can read great while the system is still wet or restricted. Gauge placement matters.
Shortcut 4 — Skipping the hold test
If you don’t isolate and watch the micron rise, you didn’t verify anything. You might have a dry, tight system. Or you might have moisture/leaks that show up later as performance problems, repeated service calls, or early component failure.
Shortcut 5 — Contaminated pump oil
Vacuum pumps rely on clean oil to pull deep vacuum effectively. Old or moisture-saturated oil slows everything down and can make techs “give up early” because the numbers won’t drop.
What homeowners should ask for (simple, practical, reasonable)
You don’t need to micromanage the install. You just need a couple of clear deliverables:
“What micron level are you pulling to?”
You’re listening for ≤500 microns, ideally ~300 or lower.
“Are you doing a standing vacuum / decay test?”
They should isolate the system and confirm it holds in an acceptable range.
“Where is the micron gauge connected?”
Best answer: on the system, away from the pump, not on the pump itself.
“Are you removing the valve cores while evacuating?”
This is a strong signal they care about doing it efficiently and correctly.
If a contractor gets defensive about these questions, that’s useful information.
Bottom line
Deep vacuuming is one of those steps where:
doing it right is mostly invisible,
doing it wrong can take months to show up,
and the homeowner is the one who pays for it.
That’s why we call it out as Step #1 in our San Francisco best-practices checklist.